Tuesday 28 February 2017

iOS updates to fix frequent iPhone 6 shutdown.


You own an iPhone 6 or iPhone 6s shuts down at random, updating to the newest version of iOS may fix this issue.


Apple told TechCrunch that software problems are causing a little number of iPhone owners to experience random shutdowns, but majority of the users reported considerably fewer issues after they upgraded to iOS 10.2.1.


Apple says more than 80 % of iPhone 6s and 70 % of the iPhone 6 shutdowns have been rectified with the update. Apple did not comment on the rest that are still experiencing problems but said the update permits those users to restart their devices following a shutdown without plugging it into a power source.


"It is vital to notice that these surprising shutdowns don't seem to be a security issue, however, we tend to comprehend it can be an inconvenience and needed to fix the problem as quickly as possible," Apple said during a statement to TechCrunch.


The shutdown issue seems to be similar but not identical to a battery issue late last year that prompted Apple to recall a little batch of iPhone 6s handsets factory-made between September and October 2015.


That issue also resulted in random shutdowns, but they were battery connected and not a problem with the software, Apple said. If you're experiencing random shutdowns, it's in all probability best to bring your device to an Apple store and update it to iOS 10.2.1 to make positive that neither the battery nor the software are causing issues.


Apple says it'll shortly add a "your battery needs service" message to the battery data screen in the Settings app when the phone detects a battery problem, according to TechCrunch.

Learn Microsoft Excel lesson #27


Challenge and create tables


Leave your comments.
You may also be interested in Learn Microsoft Excel free video lesson #23

Monday 27 February 2017

How to change windows MAC Address


We will learn How to Change MAC Address on Windows without using a tool.  
What is MAC address? In Wikipedia Voice: A media access control address (MAC address) is a unique identifier assigned to network interfaces for communications on the physical network segment. MAC addresses are used as a network address for most IEEE 802 network technologies, including Ethernet. Logically, MAC addresses are used 


Requirments

  • Windows XP, Vista, 7, 8, 10\


Step by step How to Change MAC Address on Windows:

1. Open our command prompt (press windows key + R and type cmd).

Type ipconfig /all to view our MAC address. On this picture is my MAC address.


2. Now the next step open run (press windows keyboard + R and type ncpa.cpl). When window pop up, right click your connection and choose properties.(see picture below) 


3. A connection window now will pop up. Click configure button


This configuration is on a wireless connection, yours could be any of your choice.
Another popup window will show up, click advance on the new popup window. On the property column select and click on network address and on the value column ( farther right) click on the the empty radio button and fill in the desired MAC address, in this case, my choice  is 011111111111. click okay when your done


4. Start command prompt, go over to adapter settings and confirm your configuration

You also be interested in How best to use Windows File Explorer


Saturday 25 February 2017

How to Fix windows 10 touchpad issues.


For me, touch pad is a component marked to be disabled permanently. I used it in the past but had an experience with a laptop I liked a lot, constant use of touch pad changed the colour on that spot thereby defacing my much-loved touchpad since then I stopped the use of touch pad.

This will not be the same for other folks, there are those who prefer touchpad to mouse anytime even though it is not a good experience, especially if you don't know how to adapt it to your way of operating it or if you don't know how to troubleshoot it. 
This article provides a short guide that will show you how to fix touchpad problems on Windows 10.

Let me start off by showing you how to customize the touchpad's settings so that you can use it in a comfortable fashion.


·        Cursor speed - 

     If your screen is moving a lot faster or a lot slower than your finger on the touchpad, there's a very simple fix for your troubles: open the Start Menu, click on Settings (the icon that resembles a cog), then go to Devices --> Mouse & touchpad and press the small button named Additional mouse settings. In the Mouse Properties window that opens up, go to the Pointer Options tab and you'll see a Select pointer speed bar; just drag the cursor on the bar to increase or decrease the speed.


      Double-click options

      if whenever you tap the touchpad, Windows perceives it as a double-click, you can fix that as well: repeat the steps from above to get to the Mouse Properties window and in the first tab, the one called Buttons, there's a bar that will allow you to increase or decrease the double-click speed.

You should know for convenience that you can use and create your own gestures for the touchpad, but only works with Precision touchpads. Those who have a touchpad capable of using gestures should see a "Your PC has a precision touchpad" text in the Mouse & touchpad section of the Windows Settings.

To see and customize these gestures, you will need to get to the Mouse Properties window, look for a tab named ELAN, click on Elan Smart-Pad in the Device section then press the Options button and look around for the gesture options.


In case your touchpad dies for any reason what so ever, the quickest fix for this is to use a mouse, head to the Mouse Properties windows, click on the Elan tab, select your touchpad and press the Enable device button. 

In case you don't have a mouse at hand, you can do it with just your keyboard: press the Win button to open the start menu, then start typing Mouse & touchpad until the option with the same name appears and press Enter. You will see a Windows Settings window; press tab until the cursor gets to Additional mouse options and press Enter. 

A new window will open up, press the Tab key to navigate the cursor around and once you reach the tabs from the top of the window, go to Elan. Again, use the Tab key to navigate to enable the device.


Update your drivers


I'm using a 2017 Dell Latitude and when I tried to update the touchpad driver, I was told that the driver was up-to-date; the driver is from 2006. So, the odds are your touchpad driver is current and not the source of your touchpad problems. Still, it's worth checking if your touchpad is acting up. To do so, search for Device Manager, open it, go to Mice and other pointing devices, and find your touchpad (mine is labeled HID-compliant mouse, but yours may be named something else). Right-click on your touchpad and click Update Driver Software.


Your laptop will check the internet for updated driver software and, hopefully, update accordingly. If your computer can't find an updated driver, you may need to look for the updated driver by yourself. Look at the downloads sections of your laptop manufacturer's website or just Google "[LAPTOP MODEL] Windows 10 touchpad driver." You may need to uninstall your old touchpad driver (Device Manger, right-click on touchpad, Uninstall) before installing the new driver.

You may also be interested in 3 simply ways of breaking into a windows PC

Microsoft Releases new update for Arrow launcher for Android


Screen Capture

Microsoft just launched a new version of its Arrow Launcher for Android which it describes as its “biggest release yet.”
This solution replaces the stock Android launcher, or home screen, and is a key component of the Microsoft fan Android experience.


 Arrow Launcher was launched for the first time by Microsoft in late 2015 and has had series of updated ever since, adding a lot of improvement and features based on feedback. Arrow Launcher 2.0 arrived in July 2016 with Office 365 commercial compatibility and improved performance, and version 2.2, also a major release, sported much-improved customization. A 2.3 release from September provided further refinements.


New Utility screen.

 A new Utility screen allows you pin utility cards as individual pages, and customize them as you wish. This replaces the Google Now screen on Android phones, and you access it the same way, by swiping to the right.

Utility Screen


Enhanced performance.

 According to Microsoft, Arrow Launcher is now 10 percent faster than before and uses 15 percent less battery, and 20 percent less memory.
So many will switch their Google Pixel XL over to Arrow Launcher and will be using this as their home screen experience again moving forward. That new Utility screen will be a big focus, of course.


App Screen

Friday 24 February 2017

How to disable Windows Shortcuts


Win shortcut

Most people discover the windows key on their keyboards extremely beneficial in combination with other keys it permits to speedy carry out actions like seeing your computing device, launching a run box or starting the begin menu. however, that key also can be very annoying, specifically for a gamer; as if he or she hits it by way of mistake in place of pressing ctrl or alt, it will take a consumer out of the sport. if you're in the 2d class, right here are some short answers.

Before we start, you need to understand that we are able to be tampering with registry files and in case you alter the incorrect issue, you can compromise your running device, so please be attentive and carefully observe the steps offered in this guide. there are two solutions for disabling the home windows key shortcuts: the one that everybody can use includes developing a home windows registry report, at the same time as the alternative can only be employed through those who have windows 10 seasoned or home windows 10 business enterprise because it requires tinkering with the group policy.


Editing Windows Registry

Here are the steps that you need to take if you're a Windows Home user:
  • Launch the Registry Editor by clicking the Start button, typing in "regedit" (without quotes) and clicking on the Run Command with the same name that appears in the Best Match category.
  • In the left-side pane navigate to HKEY_Current_User --> Software --> Microsoft --> Windows --> Current Version --> Policies --> Explorer.
  • Right-click the Explorer entry from the left side pane and choose New --> DWORD (32-bit value)
  • Type "NoWinKeys" (without quotes) as the name of the registry file that you've created.
  • Double click the NoWinKeys entry and modify the Value Data to 1, leaving it hexadecimal.
  • Restart 


nowinkey

When you are done, if you log back into your Windows account, the Win key will not any more roles. The snag now is that you're going to repeat these steps for all the Windows user accounts that don't want to use the Win button. To enable the Windows logo key functionality once more, simply open the Registry Editor again, navigate to the NoWinKeys file that you created, then delete it and either restart your PC or log-out of your account.

Group Policy

If you use the Pro or Enterprise version of Windows 10, you may find the Group Policy solution much simpler. You need to follow these steps:
Launch the Local Group Policy Editor by clicking the Start button, typing "gpedit.msc" (without quotes) and clicking the Microsoft Common Console Document with the same name.
On the left pane, go to User Configuration --> Administrative Templates --> Windows Components --> File Explorer.
On the right pane, find the Turn off Windows+X hotkeys entry, double-click it, select Enabled and press OK.
Restart.
To reverse the change, simply repeat the steps but select Disabled instead.

You may also be interested in How to Repair a Corrupt PST/OST File

Thursday 23 February 2017

How to customise ringtones on you android phone


Ringtone adjustment


When you determine to own an android smart phone, customization was in all probability at the top of the list. Several longtime android devotees swear by the ability to change up each element of how their phone works.


So maybe you wish to extend that capability to ringtones. Sure, there are those sounds that come back on your phone (we’ll show you ways to tweak those, too) however, you can also opt for music from your own sources. Here’s what you need to do.


Assign appropriate permissions

Permission


You will need to go into the permissions. Get there by going to Settings > App Permissions > Storage. Then toggle on the setting for contacts.


This will allow you to pick a ringtone from outside the default list because you’ll be able to access your internal storage. One option is to save audio files to your phone, which you can do with a third-party app or by inserting a file to drive and then saving it to your hardware storage.


Editing the ringtone


Go to Contacts. Tap the one want to edit, and then select the overflow menu (three vertical buttons) and you’ll see an option for where to get the sound from.

edit ringtone


Then, you can pick the picture from the drive. You can also opt to use a third-party app like Zedge and Ringtone Maker.

Zedge ringtone maker.


They allow you access their database of ringtones and then to save you to your local storage. 
You can opt for your own sound. If it’s in Google Drive, Dropbox, or another cloud service you’ll need to download it to your device so that you can access it from the contact editing menu. 
By assigning specific ringtones to individuals in your contacts, you’ll know right away who is calling. So that way you can rush to pick it up, or if it’s someone you’d rather not talk to, ignore

You may also be interested in How to install Android Beta on pixel and Nexus phone

Tuesday 21 February 2017

How to install Android Beta on pixel and Nexus phone

Nexus and Pixel

Google is continually at work perfecting the most recent version of android, however, you may not understand that you just can facilitate test it out. 

Before any new version of android is released, whether or not it’s a full new major “sweet treat” version or a simple maintenance release (like the new 7.1.2 update for example), you'll be able to register to test it weeks or months before it’s available for public download. All you need is a Google account and the right phone.


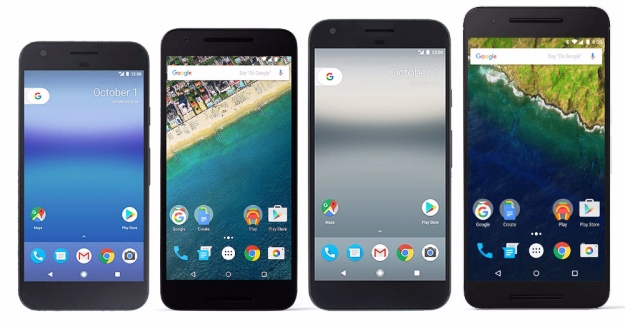
And Google makes it straightforward to register, as long as you have got one of the newer “pure Android” handsets. Currently, the list is pretty short, but if you own a Nexus 5X, Nexus 6P, or one amongst the pixel phones, you’re ready. (Additionally, you'll be able to install the beta on the short-lived Nexus Player set-top box, and also the pixel C Tablet.) 

Those phones should be sensible for the remainder of this year, as Google has vowed that Nexus level devices will “receive major updates for a minimum of 2 years.” for instance, the 2014 Nexus 6 and Nexus 9 solely recently dropped off the list, thus last year’s Huawei and LG Nexus devices ought to be good at least through the rest of 2017.

If you have the proper hardware, head over to Google’s android Beta Program website. You’ll need to log-in with your Google account, and once you are done, you’ll be taken to a page that explains what the program is all about. 

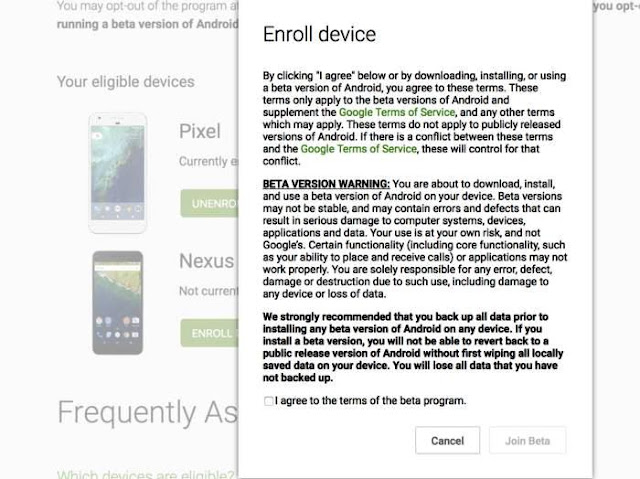
The same old beta disclaimers apply, and Google warns that the updates “may contain errors and defects that may have an effect on normal functioning of your device.” thus before you enroll your phone, it’s a good idea to back up your data first, just in case.
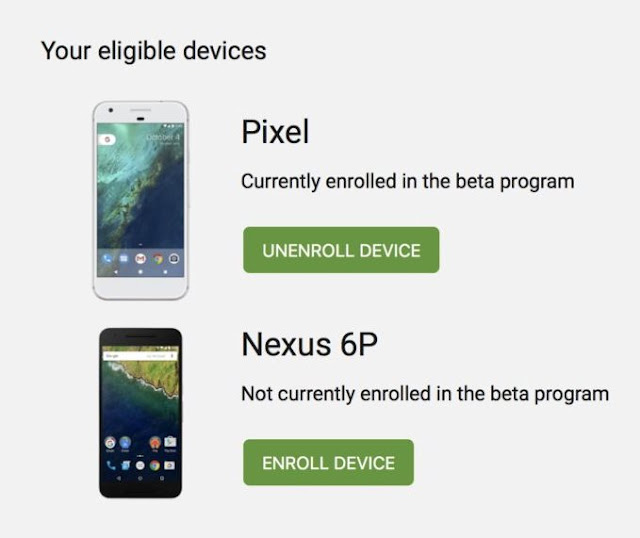

Eligible Phones

In the middle of the page, you’ll see a listing of your eligible devices, with an enroll button next to it. tap it and you’ll see be taken to a disclaimer screen. Check the agree box, choose join beta, and your rocking already.


Enroll

If a new beta isn’t accessible, it'll be business as usual on your phone. Security updates are installed as normal, likewise as any official releases, and you won’t know something has modified. 
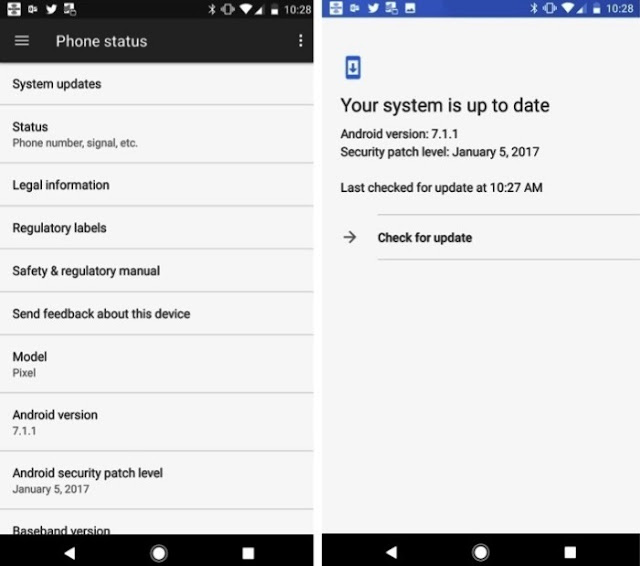
Once a beta does land, you’ll get a notification concerning it similar to you commonly would (although it'll indicate that it’s a beta update), otherwise you will sign in the usual place: Scroll all the way down to the about phone tab in Settings and choose System updates. 
it'll install over-the-air normally, with a restart, and whenever a new one releases, you’ll undergo a similar method. And once the version you’re testing releases publicly, you’ll be able to install that version on your phone, too.


Phone Status


If you’ve flashed your device and simply wish to install the files yourself without registering for the program, you can grab them from Google Developers website. simply scroll all the way down to the latest section, find the version you’re searching for, and follow the link to get to the general public Beta images page. Then, find your device and download the suitable file.

With betas, Google is looking for feedback, so if you spot something that needs fixing, you can contact Google directly by heading to the Settings app, tapping about, and then Send feedback about this device. additionally, Google hosts an android Beta Program Google+ community, where you'll share feedback with different user


Finally, if you’re having serious issues with a specific beta, you can always downgrade to the most recent stable version. simply choose Unenroll device on the same android Beta Program page where you registered your device, and Google will deliver the most recent general release to your phone. 
However, as Google warns, it “will wipe all data on the device,” therefore yet again, you’ll need to make a copy your data before downgrading.


You may also be interested in 9 New Android and Apple Games

Monday 20 February 2017

Learn Microsoft excel free videos lesson #26


Feel free to leave a comment

you may also be interested in Learn Microsoft excel free videos lesson #24

LG V30 to include Snap Dragon


Apple re While LG‘s sole focus at the instant is probably going the forthcoming LG G6 — which is just days away from its debut — the company is still quietly working on its other flagship smartphone due sometime later this year. that may be the follow-up to last fall’s highly-praised LG V20, tentatively referred to as the LG V30. because of early leaks coming out of China’s Weibo website, we’re getting some concepts of what to expect once it involves the mechanical man device’s specs.

Assuming these details are accurate, right off the bat it’s clear the LG V30 are going to be a hefty upgrade over the V20. 
The phone is said to feature Qualcomm’s powerful new flower 835 processor, which Samsung has exclusivity on till April, and can pair with chip with 6GB of RAM.


Other options mentioned within the leak embody the utilization of twin cameras on each the rear and front of the device, signifying the LG V30 can take its photography capabilities terribly seriously. 

Similarly, the phone can high-end audio because of enhancements on the LG V20’s Quad DAC technology. There’s conjointly the promise of different “mysterious” options on the method, however, that’s anyone’s at this point.


The LG V20 was distinctive in that it had both a 5.7-inch Quad HD display and a secondary IPS Quantum screen. Previous leaks have mentioned that the V30 can skip this twin show setup in favor of one thing new, however, there’s no word nevertheless on what LG may well be designing.


How to make iPhone display easily readable


iPhone

Apple’s iPhone has continuously been a cut above the rest — but especially when it comes to its laundry list of helpful accessibility features, which might not solely build your device easier to browse, however additionally to assist navigate and perform sure tasks.


With the release of iOS ten, Apple has baked in a slew of accessibility options that are geared towards those who either have a tough time reading text or deciphering objects on their display, or who merely wish to avoid having to strain their eyes, holding the device just a few inches far from their face so as to interpret the on-screen content. then we present to you an exclusive, updated tips and tricks guide that is meant to assist you get the most.


How to Turn on Display Zoom

Display Zoom is a brand-new feature in iOS 10, which will essentially magnify the entire display — and all the content thereon — by default. While a Zoomed display will typically show less content, depending on what you’re looking at, the items that appear will be larger and more pronounced. These include app icons, fonts, menus, and more.


  1. Open Settings
  2. Tap Display & Brightness
  3. Scroll down to Display Zoom and select the View option.
  4. Tap Zoomed.
  5. Tap Set.

How to Use Screen Zoom

You can also Zoom in on either the entire screen, or certain parts of it (via a dedicated window), depending on your personal preferences. To enable Zoom.
  1. Navigate to Settings.
  2. Tap General.
  3. Tap Accessibility.
  4. Select the Zoom option under Vision.
  5. Find Zoom and use the toggle to turn the feature on.
This will bring up a sub-menu consisting of a number of different choices, including the type of Zoom (Fullscreen or Window View), and how much you’d like to Zoom in or out by default.
Once enabled, simply double-tap anywhere on the display using 3 fingers; pan by tapping once and moving the same 3 fingers towards the various edges of the display to navigate Zoom view.

To return to the normal display view, simply double-tap with 3 fingers once again.

How to Bold Your iPhone’s Font
You can also make the text on screen appear in Bold-type, which will apply to all system fonts and certain 3rd party apps. Here’s how to do it.

1.       1.Tap Settings.
2.       2.Tap Display & Brightness.
3.       3.Toggle the Bold Text option to On.
4.       4.Tap Continue. (Note: doing this will require that your device automatically reboots, which should take about a minute or so to get back up and running.

How to Use Magnifier

For those who want to easily read printed text, or simply zoom in on an object at up to 5x digital magnification, Apple has baked a super-intuitive and easily-accessible Magnifier utility into iOS 10. Here’s how to enable it.
  1. Open Settings
  2. Tap General
  3. Tap Accessibility
  4. Then select Magnifier under the Vision sub-menu.
  5. Once the option is toggled to On, return to the home screen and rapidly triple-click the home button (or triple-press on iPhone 7 and iPhone 7 Plus), which will bring up the magnifier window by default.

You’ll see the slider bar, as shown below, which will allow for easy zooming in or out on everything from text to objects, and more. You’ll also be able to turn on flash to illuminate the text or object you’re trying to view.


How to Increase your iPhone’s Font Size

A great way to make fonts easier to read within select iOS system apps such as Mail, Messages and Notes is to increase the font size. This is how to do it.


Increase Font Size

  1. Tap Settings.
  2. Tap General.
  3. Tap Accessibility.
  4. Select Larger Text.
  5. From this menu, you’ll be able to slide your finger along the sizing bar and choose the font size that’s most comfortable for you.
  6. To select an even larger font, you can also toggle the Larger Accessibility Sizes option to on, as shown below, and choose from even bigger sizes.


How to turn your iPhone camera into a magnifying glass using hidden mode

iPhone magnify

Apple added a stylish and amazing hidden camera mode in the latest version of its iPhone OS, iOS 10.

"Magnifier" mode uses the iPhone's camera to enlarge text or other small things — handy, especially, for reading fine print, or zooming in on small details.

The hidden mode can also regulate brightness and color, which is helpful for people who might have problems seeing specific colours.

Using magnifier is simple after you turn it on.


First you have to turn it on. The setting is found in Settings > General > Accessibility. turn "Magnifier" on.


Then it is easy to access. Simply press the home button thrice anywhere on the iPhone — either on the lock screen, the home screen, or in an app.

Here's what it the screen looks like:


You can change the magnification by with the slider as needed:


By tapping the Venn diagram in the lower right hand corner, you can change the colors if that will make the image easier to see. You can increase or decrease brightness, contrast, and even invert colors.

Saturday 18 February 2017

How to customise Android icons with icon pack


The look on your Android home screen can actually be changed or customized to suit your viewing pleasure, one of the best ways to do that is through custom icons.
When compared to other ways to change the look of your Android phone, it requires more work and time from you, especially if you do not own a HTC 10 or Galaxy S7 that comes with a custom theme store for quick and easy makeovers.
This is what you need to do to achieve the type of custom look that makes your friends say, “wow. How did you do that? When they browse your phone.

Download a Launcher


In order to change your icons, you should first get a custom launcher.  You are doing this first for the obvious reason. That’s because many of the icon packs, which are separate applications you’ll need to install, require a launcher to work with.
Let’s go through an example. One of the best launchers you can get is Action Launcher 3. So the first step is to get it from the Play Store. It’s not the only choice, but it’s extremely popular among Android enthusiasts and the developer is constantly adding in improvements.

Now the real fun begins. As I alluded to, you can’t swing a cat through the Play Store without hitting an icon pack. If you want a starter kit, consider Moonrise Icon Pack, Pixel Icon Pack (especially if you want that Pixel look without the phone), Polycon, Click UI, and Urman.

Once you install one, you’ll usually have to select which custom launcher you want it to work with.
Download some Packs


Now the real deal begins. As I alluded to, you can’t swing a cat through the Play Store without hitting an icon pack. If you want a starter kit, consider Moonrise Icon Pack, Pixel Icon Pack (especially if you want that Pixel look without the phone), Polycon, Click UI, and Urman.

Once you install one, you’ll usually have to select which custom launcher you want it to work with.


However, it’s a pretty wide ocean out there. The key is to try out some different packs that you think will look great and see how they turn out. I like to keep an eye on is how recently the app was updated.

If it’s been in the last few months, you know that it’s a pretty active developer who is eager to squash bugs. Icons packs, just as with other applications in general, that sit dormant aren’t worth your time.


The all-in-one method


If you have the right phone or launcher you may be able to bypass hunting for icon packs altogether. Some custom launchers like Apus Launcher have different types of icons that you can use to change without adding in a custom pack.


Additionally, the Galaxy S7, S7 Edge, and HTC 10 have their own theme stores that let you install a fresh experience on your phone.


You may also be interested in Checkout this Samsung phone tablet transfer App