Thursday, 11 May 2017

HP's Elite x2 1012 G2 hybrid laptop surpasses Microsoft Surface Pro 4

Elite X2 Hybrid


Microsoft's Surface Pro 4, since it was released at the end of 2015, there's been no shortage of alternatives. But if a Surface Pro 5 is unlikely to "surface" anytime soon, just as the speculations predicted, HP has just launched a very appealing 2-in-1 that should demand your attention.


The updated Elite x2 1012 G2 surpasses the Surface Pro 4 in different areas. At just 0.36 inches thick, it's skinnier than Microsoft's convertible, and it packs the Intel Kaby Lake processors that weren't available when the Surface Pro 4 was released by Microsoft. 


HP has also addressed one of the original Elite x2 1012's pitfalls- increasing the resolution and size of its touchscreen display from 1,920x1,080 to 2,736x1,824 and 11.6 inches to 12.3 inches, which matches the Surface Pro.
 
Elite x2


While the Surface Pro 4 comes with a choice of sixth-generation Core CPUs, the x2 1012 G2 can be equipped with either the Core i3-7100U, Core i5-7200U or i5-7300U, or Core i7-7600U. But none of these use Intel's Iris integrated graphics, which the Surface Pro's i7 chips include. Like Microsoft's 2-in-1 tablet, the x2 1012 G2 can support up to 16GB of RAM and a terabyte of solid-state storage.
 
Easy to disassemble


HP's hybrid has further advantages over the latest Surface Pro. It's built to MIL-SPEC rugged standards, and also includes the HP Collaboration Keyboard and a Wacom digital pen. HP makes it easier to open up the device for repairs/upgrades than the notoriously clamped-down Surface Pro hardware.


One area where the Surface Pro 4 still has an advantage is in the base price. You can pick up the cheapest Surface tablet for $799, while the base Elite x2 starts $300 higher. You don't get a keyboard or pen with the base Surface Pro 4, however, and you're stuck with an Intel Core m3 processor instead of a more powerful Core i3. But you'll still have to wait a little bit even for the new Elite x2 1012 G2, as HP says it will be released in July.


Monday, 8 May 2017

Windows 10 feature: How to lock folder


Having and keeping private files private in our computer is something we'd all like to do. Luckily for us, with Windows 10, you can comfortably hide our Kingsman plans or files in a secret folder that is password protected, and you can do it without buying a third party software.

This is how to create a folder that you can fill with files you want to keep secret, lock it, open it and repeat.

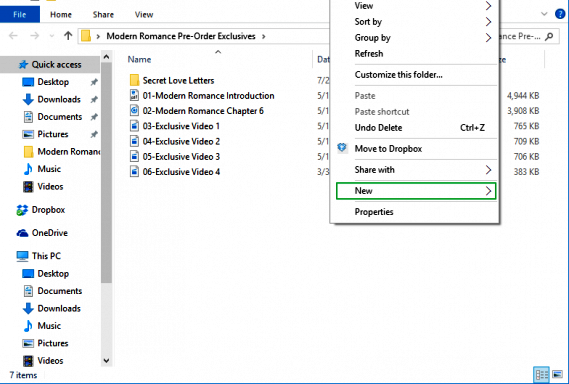
1. Open the folder you want to protect the contents, then right click inside and select new ( the location of the folder is not relevant). See screenshot.


2. Click on "Text Document" in the new sub-menu.. See screenshot.


3. Tap the ENTER key, note that the name of the Text Document is irrelevant and you have the option of deleting once you have successfully created your lockable folder. See screenshot.


4. Open the Text Document file by double clicking on it then copy and paste the code.


cls
@ECHO OFF
title Folder Locker
if EXIST "Control Panel.{21EC2020-3AEA-1069-A2DD-08002B30309D}" goto UNLOCK
if NOT EXIST Locker goto MDLOCKER
:CONFIRM
echo Are you sure u want to Lock the folder(Y/N)
set/p "cho=>"
if %cho%==Y goto LOCK
if %cho%==y goto LOCK
if %cho%==n goto END
if %cho%==N goto END
echo Invalid choice.
goto CONFIRM
:LOCK
ren Locker "Control Panel.{21EC2020-3AEA-1069-A2DD-08002B30309D}"
attrib +h +s "Control Panel.{21EC2020-3AEA-1069-A2DD-08002B30309D}"
echo Folder locked
goto End
:UNLOCK
echo Enter password to Unlock folder
set/p "pass=>"
if NOT %pass%==Replace_with_your_password goto FAIL
attrib -h -s "Control Panel.{21EC2020-3AEA-1069-A2DD-08002B30309D}"
ren "Control Panel.{21EC2020-3AEA-1069-A2DD-08002B30309D}" Locker
echo Folder Unlocked successfully
goto End
:FAIL
echo Invalid password
goto end
:MDLOCKER
md Locker
echo Locker created successfully
goto End
:End

5. Locate where the code says "Replace_with_your_password" and type your password instead.


6. Replace with the password you want to use to lock the folder.


7. Open the file Menu and select "Save As"


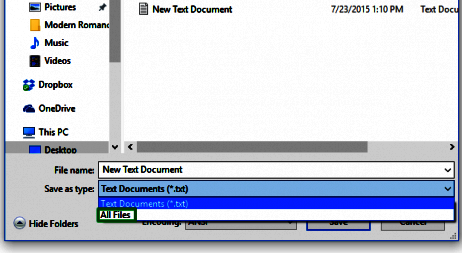
8. Click on the text document(*.txt) file next to Save as type and Select "All Files"


9. Change the file name to FolderLocker.bat and click Save


10. Double click on the Folderlocker which will generate a "Lock" folder


11. Move files you want to protect into the Locker folder.


12. Double click on the Folderlocker again, this time to lock, a cmd like screen pops up,
      asking for a confirmation to lock the folder, Enter Y for 'yes' and all your kingsman          
      secrets are ducked away from preying eyes.


13. To unlock double click on the Folderlocker and another CMD like screen pops up asking 
       for password confirmation, Enter the password you used in the code.


Saturday, 6 May 2017

BlackBerry KEYone brings BlackBerry back in business


The Blackberry KEYone was revealed at Mobile World Congress earlier this year, the new device was officially put up for sale in the UK earlier this week.

The famous old departmental store London’s Selfridges remains the only place you can buy the BlackBerry KEYone at the moment, with the department store having an exclusive until today May 5th, when Carphone Warehouse will also start selling the device.

The launch of the KEYone means that BlackBerry is really back in business. The success of KEYone is said to be hinged on physical keyboard


For first timers, it seems that the BlackBerry KEYone is setting itself up to be something truly different from everything else around today.

“We're very proud of the BlackBerry brand,” Johnathan Young, BlackBerry’s Mobile’s UK Country Manager, told Express.co.uk at the KEYone launch event.
“But we're not going in the same way as every other device.”

“There are so many alternatives around - but (the KEYone) is completely different - what we’ve decided to do is redesign for people to rediscover BlackBerry,”

“Every device looks the same now…but I think that people want choice, and this is what we’re offering them with KEYone.”


The KEYone is, of course, a visual departure from past BlackBerry devices, with a flay new all-metal build.

The front of the device also now combines the company’s iconic QWERTY keyboard with a touchscreen, meaning users get the best of both worlds.
BlackBerry is also keen to highlight the software included in its new device, particularly the DTEK security tools.

The company says that the KEYone is right up there with the most secure smartphones available today, with the advanced DTEK software combined with encryption built into the device’s hardware itself.


“Security and privacy are at the heart of what we do,” Young says, “We are the world's most secure Android phone.”


Young believes that KEYone is the key to get users to return to BlackBerry, and perhaps begin yet another Successful season for the company.

In his word "We never went away - our customers did. This will be the device that will make customers rediscover a brand new BlackBerry".

The BlackBerry KEYone is available to buy in the UK now.


How to add colours to Windows 10 available in the creators update


Windows 10 has been around for close to three years now. If you were among the very first set of users you may be able to recall that the first instance of windows 10 lacked favour when talking about colour. Practically, the only colour in the title bars was white. That was frustrating for the mere fact that we've been able to change the colour of title bars ever since Windows 3.x—but having only white title bars also made it difficult to distinguish between active and inactive windows.

Within the first five months of the initial release, Microsoft released the Windows 10 Update, which, among other things, included the capability to set the colour of the active title bar.

While being able to once again set the color of active title bars made it easier to distinguish between active and inactive windows, it would have been nice to be able to set the color of inactive title bars as well. Unfortunately, Microsoft never completely brought back that feature. It did, however; leave some codes in the registry you could use to add color to inactive title bars.


If you have been longing for more control over the colours in Windows 10's user interface, you'll be happy to learn more about the new colourization features Microsoft has bestowed upon the operating system in the Creators Update. Let's go there.

The Colours tab

The new colourizing features are of course found on the Colours tab, which you can quickly access by pressing Windows+I to bring up the Windows Settings window, typing Colour, and clicking Colour settings, as shown in the screenshot below.


Windows colour setting


Looking at the Colours tab, shown in the pic, you'll notice that Microsoft has simplified and reorganized the layout.


Colour setting layout

Customising accent Colour


Creating a custom accent colour is indeed fascinating. To see how this works, let's begin by picking a colour from the default colour palette. For example, choose Red and click the Custom Colour button.

When the Choose A Custom Accent Colour dialog appears, you can see the color is targeted on Red, as indicated by the circle in the upper-right corner of the color field and the tooltip, as shown in the screenshot, the bar on the right also shows the selected colour. The Colour Preview boxes show you how the colour will appear in the user interface.


Customising colour


The slide bar at the bottom of the colour field allows you to adjust the value of the selected colour. Value is defined as the relative lightness or darkness of a colour. Sliding to the right increases the value, making the colour lighter. Sliding to the left gives an opposite effect, making the colour darker. As you move the slider, you'll see a tooltip appear above the slider that displays the value and the colour. When you have a dark colour selected, as you decrease the value you'll reach a point where the colour is too dark and you'll see this message appear below the Colour Preview boxes: This colour is not supported. As you adjust the value, the top half of the bar on the right of the palette will change to match the colour value, while the bottom of the bar will stay the original colour. All these items are shown in the screen shot below.

slide bar adjustment 


Customising background colour

In addition to choosing a custom accent colour, you can choose a custom background colour. When you are finished choosing your custom accent color, select the Background tab.

Select Solid Colour from the Background drop-down and you'll see a Custom Colour button just below the color palette, as shown in the screenshot. Now, choosing a custom color for your desktop background works just like choosing your accent colour.


customising background colour.


You may be interested in Microsoft Release New Windows 10S

Friday, 5 May 2017

How to adjust Samsung Galaxy S8 blue light filter setting

blue light hazard


The tech of reducing the amount of blue light consumers are being exposed to at night has been trending quite big in the consumer electronics. Samsung is not left out on playing its part on the Galaxy S8 and S8+ with its "blue light filter." The feature tints the screen to a reddish glow in an attempt to help you transition to sleeping at night, and it offers a few settings so you can fine-tune the effect as strong or weak as you like.


How to turn on and configure the blue light filter

  1. Open the Settings on your phone.
  2. Scroll down and tap on Display.
  3. Tap on the Blue light filter.

  • You'll see there are two main choices here: when to turn on the light filter, and what the opacity is.

      4. Tap on Turn on now to see what the blue light filter looks like.
      5. Using the Opacity slider at the top, adjust how strong the filter should be when it turns on. 
         You can then turn off the blue light filter to adjust the other settings.
     6. Choose whether you want to have the filter turned on from sunset to sunrise, or on a specific                 hourly schedule.
  • Most people will prefer the ease of letting the filter turn on at your local sunset time and turn off at local sunrise.
  • If you select Custom schedule, set the starting and ending hours manually.

     7. The Blue light filter will now turn on automatically each day.


Samsung's blue light filter


Just with a little of tweaking, the Galaxy S8's blue light filter is a nice little tool that will help with your eye strain late at night and early in the morning. Best of all, once it's set up it'll just adjust automatically and you don't have to do any other configuration,


Samsung to roll out update to fix Galaxy S8 and S8+ reddish tint


Red tint issue


Samsung is now rolling out an OTA update that fixes the red tint issue on the Galaxy S8 and S8+. The update kicked off in Korea last week and is now available for Indian and European units. The fix is going out to S8 and S8+ bits in the UK, Germany, Turkey, and the US. The update software should be rolling out to additional countries in the region and other regions shortly.


The Galaxy S8 and S8+ phones are not going on sale until in some countries yet, but Samsung is kicking off deliveries a few days earlier for customers that have pre-ordered the device. With close to 1,000,000 bookings, Samsung is seeing a lot of interest in its flagships from the subcontinent.

Update to fix red tint


The update comes in at 426.7MB, and alongside the display calibration to fix the reddish tint noticed by a lot of customers using the S8 and S8+, it includes the usual stability and bug fixes.


Thursday, 4 May 2017

Google adds new security check to Gmail for Android


google doc under attack


Because phishing scams and threats have indeed proved to be real as the day goes by, Google has introduced a new feature to make it easier for users to protect themselves.

The security feature for Gmail on Android will show a pop-up warning when users click on a suspicious link. While the choice of whether or not to proceed to the website is still left for users to decide, Google believes this warning will encourage people to be more cautious about links they click.

The move comes in the wake of a Google Docs phishing scam recently that gave Google customers access to the contents of emails, contact lists and online documents of victims.


Google revealed the new feature in a post on its G Suite updates blog.
The blog said: 'This week, we're introducing a new security feature in Gmail on Android to help you keep your email safer.

'When you click on a suspicious link in a message, Gmail will show a warning prompt helping you keep your account safe.'

The message will read: 'The site you are trying to visit has been identified as a forgery, intended to trick you into disclosing financial, personal, or other sensitive information.'
 
google message to users
Users will then have the option as to either proceed to the website or delete the message.
Google said: 'While not all affected email will necessarily be dangerous, we encourage you to be extra careful about clicking on links in messages that you're not sure about.
'And with this update, you'll have another tool to make these kinds of decisions


Google says that the feature is being rolled out bits, and will take some time to reach all users worldwide.
It is not clear yet whether the feature will be rolled out to iOS users.
The update follows a malicious email that was flagged recently that included an invitation to view a Google Doc.

Sample of attack email


Users were asked to click on the link, which gave the hackers behind the attack access to the contents of their Google accounts, including email, contacts, and documents.
Not only were victims' accounts controlled by a malicious party but if users followed the instructions, the same email was sent to anyone they had ever emailed and their contacts.


The scam surfaced and appeared to first target journalists - many reporters from BuzzFeed, Hearst, New York Magazine and Gizmodo reported receiving the infected email.


Target Victims had observed that the email sender may be someone personally known to them or someone in their contact list. Victims were asked to click on a link to view a document, which provided the hackers access to the contents of their Google accounts, including email, contacts and online documents, according to security experts who reviewed the scheme.


Wednesday, 3 May 2017

Ready to use Excel formula: Calculating a Running Total


Some organizations like to see a running total as a mechanism to analyze the changes
in a metric as a period of time progresses. Screen shot illustrates a running total of units
sold for January through December. The formula used in cell D3 is copied down for
each month:


=SUM($C$3:C3)


How it works

In this formula, you use the SUM function to add all the units from cell C3 to the
current row. The trick to this formula is the absolute reference ($C$3). Placing an
absolute reference in the reference for the first value of the year locks that value down.
Locking the value down ensures that as the formula is copied down, the SUM function
always captures and adds the units from the very first value to the value on the current
row.


Samsung Galaxy S8 owners blocked from customising Bixby button in new phone


SAMSUNG GALAXY S8 users can no longer be able to customise the Bixby button on their new phone, following a change of heart by the South Korean technology firm.

Samsung is blocking Galaxy S8 owners from changing the shortcut linked to the Bixby button

The new button, housed beneath the volume rockers on the left hand-side of the phone, is reserved for Samsung's new voice assistant, Bixby.

Tapping the button while within a supported app will permit Samsung Galaxy S8 owners to regulate functions on the phone with simple voice commands.

Bixby is context aware, which means that, provided you are within a compatible app, you can refer directly to things that are happening on-screen.


Commands like "make a folder with these photos”, “when was this taken?” or "what is this?” will work with the new assistant – unlike several of its rivals.

Unfortunately, Samsung delayed the voice support – with the functionality supposedly set to launch in the United Kingdom later this year.

The Bixby button will only serves to launch a Google Now-style news feed that attempts to surface useful information, upcoming calendar appointments, and relevant news stories.

Early owners of Galaxy S8 handsets were allowed to remap the shortcut linked to the Bixby button.

This enabled users to remap the button to trigger rival voice assistant Google Assistant, launch the default camera, or open a favourite application.


But, the latest Galaxy S8 firmware update pushed-out by Samsung shuts down the ability to remap the Bixby button.


Previously, the command from the Bixby button was "intercepted" by the Accessibility Services built into Android.


This also has enabled third-party apps – provided they had the requisite accessibility permissions – to change its default function.

Samsung with the latest Galaxy S8 system firmware update has closed this loophole.

A couple of third-party developers have since launched new solutions that claim to remap the Bixby button, including the popular BixRemap.


Tuesday, 2 May 2017

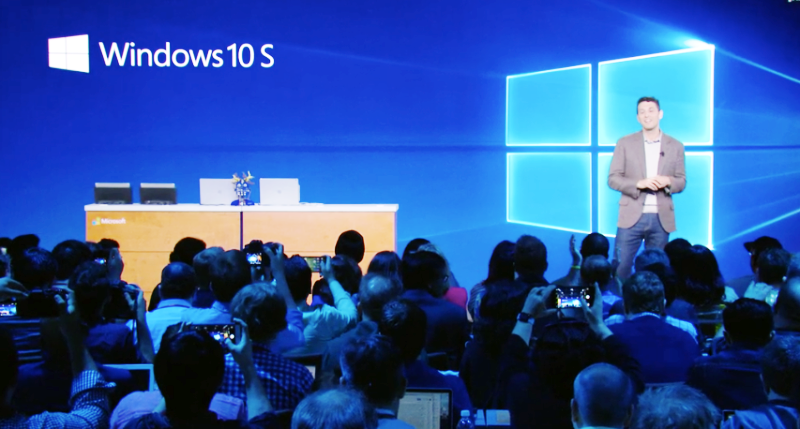
Microsoft Release New Windows 10S


Win10S annoucement

What is Win 10S

Windows 10 S is Microsoft’s new lightweight operating system. It’s meant to be cheaper and less processor intensive than Windows 10 Home or Pro, the versions of the OS found on most laptops and desktops today.


How is it a lightweight?

There are far fewer programs running in the background. According to Microsoft, a laptop running Windows 10 S loads a user profile (including apps and preferences) 15 seconds faster than an identical laptop running Windows 10 Pro.

Microsoft-verified security

Your applications are delivered via the Windows Store ensuring Microsoft-verified security and integrity. Microsoft Edge is your default browser since it’s more secure than Chrome or Firefox.1 Windows Defender and all ongoing security features of Windows 10 are included.

Enhanced security

Performance that lasts

Designed for superior performance that lasts, start-ups are quick and built to stay that way. With Microsoft Edge your online experience runs fast and safe. Stream HD video, switch across apps and stay productive on the go. 


What systems will it be available on?

A number of inexpensive laptops from major computer manufacturers including Dell, HP, and Acer.


You may also be interested in Microsoft Surface Pro 5 New Leaks

You may also be interested in Microsoft Word used to circulate dangerous Dridex malware


How to Run macOS and Windows 10 on the Same Computer


MacOS


Apple’s tool for the Mac that allows you to install and use the Windows operating system on a separate hard drive partition, is capable of running Windows 10 — if your hardware meets the system requirements. According to Apple’s guidelines, the earliest iMac model that supports running Windows 10 is the “Late 2012” edition with either a 21.5- or 27-inch screen.

Apple released its 2012 model in the fall of that year, so if you got the iMac before Nov. 30, you may have the previous version — which is not on the list of supported hardware for using Windows 10 through Boot Camp. You can see which iMac model you have by going to the Apple Menu in the upper-left corner of the screen and selecting “About this Mac”; the name of the model is listed on the Overview tab. (If your iMac does not meet the requirements, check out software like Parallels Desktop for Mac that lets you run Windows 10 alongside macOS instead of installing and running Windows from a separate hard drive partition.)


Mac windows tool


If your iMac passes muster for Boot Camp, make sure you have 55 gigabytes of free space on your start-up drive and an empty USB flash drive with a capacity of at least 16 gigabytes. You also need a copy of the 64-bit version of Windows 10, which you can buy as a download or on a USB drive from Microsoft.


Before you start installing Windows 10, make sure your Mac’s software is fully up-to-date and back up your computer just in case something goes awry. If you have not created a partition on the Mac before nor installed Windows on it, go to the Mac’s Applications folder and to the Utilities folder and open the Boot Camp Assistant program to get started.


Windows 10 running on Mac


If you already have a Boot Camp partition with Windows 7, you can update it to Windows 10 as you would on a PC. If you want the very latest edition of Windows 10, the Creators Update released this month, Microsoft says to install the Windows 10 Anniversary Update first and then update the system to the Creators Update.


You may also be interested in Ripjaws KM780 Keyboard

You may also be interested in How to add other time zones on windows 10


Monday, 1 May 2017

Ready To Use Excel Formulas :how to Calculate percentage distribution


Percent distribution is a measure of how a metric (such as total revenue) is distributed among the component parts that make up the total. As you can see in Figure 2-5, the calculation is relatively simple. You divide each component part by the total. This example has a cell that contains Total revenue (cell C9). You then divide each region’s revenue by the total to get a percent distribution for each region.

Revenue across regions


How it works

This formula doesn’t have a lot to it. You’re simply using cell references to divide each component value by the total. The one thing to note is that the cell reference to the Total is entered as an absolute reference ($C$9). Using the dollar symbols locks the reference in place, ensuring that the cell reference pointing to Total does not adjust as you copy the formula down.


Alternative: Percent distribution without a dedicated

Total cell

You don’t have to dedicate a separate cell to an actual Total value. You can simply
calculate Total on the fly within the percent distribution formula. Figure 2-6
demonstrates how you can use the SUM function in place of a cell dedicated to
holding a Total. The SUM function adds together any numbers you pass to it.
Again, note the use of absolute references in the SUM function. Using absolute
references ensures that the SUM range stays locked as you copy the formula down:

=C3/SUM($C$3:$C$6)


% distribution